This page covers how to redirect your users to Algoan’s Open Banking (OB) journey

Integration mode : Permanent Access
Permanent access is the standard and recommended way to integrate Algoan Transaction Data in a production environment.
It allows you to:
- uniquely identify a customer across multiple aggregation attempts
- re-launch the OB journey when needed
Each OB journey is associated with:
- one customer (persistent)
- one session (single aggregation attempt)
You can create multiple sessions for each customer.
Prerequisites
Before redirecting a user to Transaction Data, you must perform several actions :
1. Set up your redirect URIs
Trying to send your users to an Aggregation link with a redirect_uri that has not been whitelisted by yourself in the Console will result in an error
To add an authorized redirect URI, log in Algoan's Console, go to “Aggregation” tab and click on “add redirect URI”.
You can add a wildcard in your redirect_uri. For instance you can define the following redirect URI https://mywebsite.com/* . Now when you build the link, all the following redirect_uri will work :
2. Get a token
Get a token to make subsequent calls.
Your client_id and client_secret can be found on Algoan's Console under the tab "Aggregation" -> "Credentials"
Once you have them, you can call the POST /token endpoint :
xxxxxxxxxxcurl -sS -X POST "https://api.algoan.com/v1/oauth/token" \ -H "Content-Type: application/x-www-form-urlencoded" \ --data-urlencode "client_id=$ALGOAN_CLIENT_ID" \ --data-urlencode "client_secret=$ALGOAN_CLIENT_SECRET" \ --data-urlencode "grant_type=client_credentials"Example response :
xxxxxxxxxx{ "access_token": "eyJhbGciOiJSUzI1NiIsInR5cCIgOiAiSldUIi...5jUKEv5KyzShp5pqg", "expires_in": 86400, "refresh_expires_in": 864000, "refresh_token": "eyJhbGciOiJIUzI1NiIsInR5...fsWGA82PQC_6OXoyU4", "token_type": "bearer"}The access token should be cached until it expires. Do not request a new token for every user
3. Register the customer
Create (or retrieve) a customer in Algoan using your internal user identifier.
This can be done by calling the POST /register route :
xxxxxxxxxxcurl -sS -X POST "https://api.algoan.com/v2/register" \ -H "Authorization: Bearer $ACCESS_TOKEN" \ -H "Content-Type: application/json" \ -d '{ "custom_identifier": "YOUR_INTERNAL_USER_ID" }'Example response (example shape) :
xxxxxxxxxx{ "customer": { "id": "6013d7991496b7395090f05c", "customIdentifier": "YOUR_INTERNAL_USER_ID", "..." }}Calling /register with an existing custom_identifier returns the existing customer.
4. Create a session for the customer
Create a new session for the customer.
This can be done by calling the POST /sessions route :
xxxxxxxxxxcurl -sS -X POST "https://api.algoan.com/v2/sessions" \ -H "Authorization: Bearer $ACCESS_TOKEN" \ -H "Content-Type: application/json" \ -d '{ "customerId": "6013d7991496b7395090f05c" }'Example response :
xxxxxxxxxx{ "id": "6013d7991496b7395090f05c", "customerId": "6013df911496b7395090f05c", "code": "a134d023-5340-4517-9e2d-4ee6ce717b71", "status": "IN_PROGRESS", "createdAt": "{date-time}", "updatedAt": "{date-time}"}Redirect the user to the OB journey
Once the session is created, build the URL and redirect the user to Algoan's Transaction Data.
Parameters :
- client_id : can be found on Algoan's Console
- redirect_uri : can be defined and found on Algoan's Console
- session_id : output of the POST /sessions call
- code : output of the POST /sessions call. Code is used to authenticate the session on Transaction Data
Here is the sequence diagram explaining the authentification of a user in Permanent User mode :
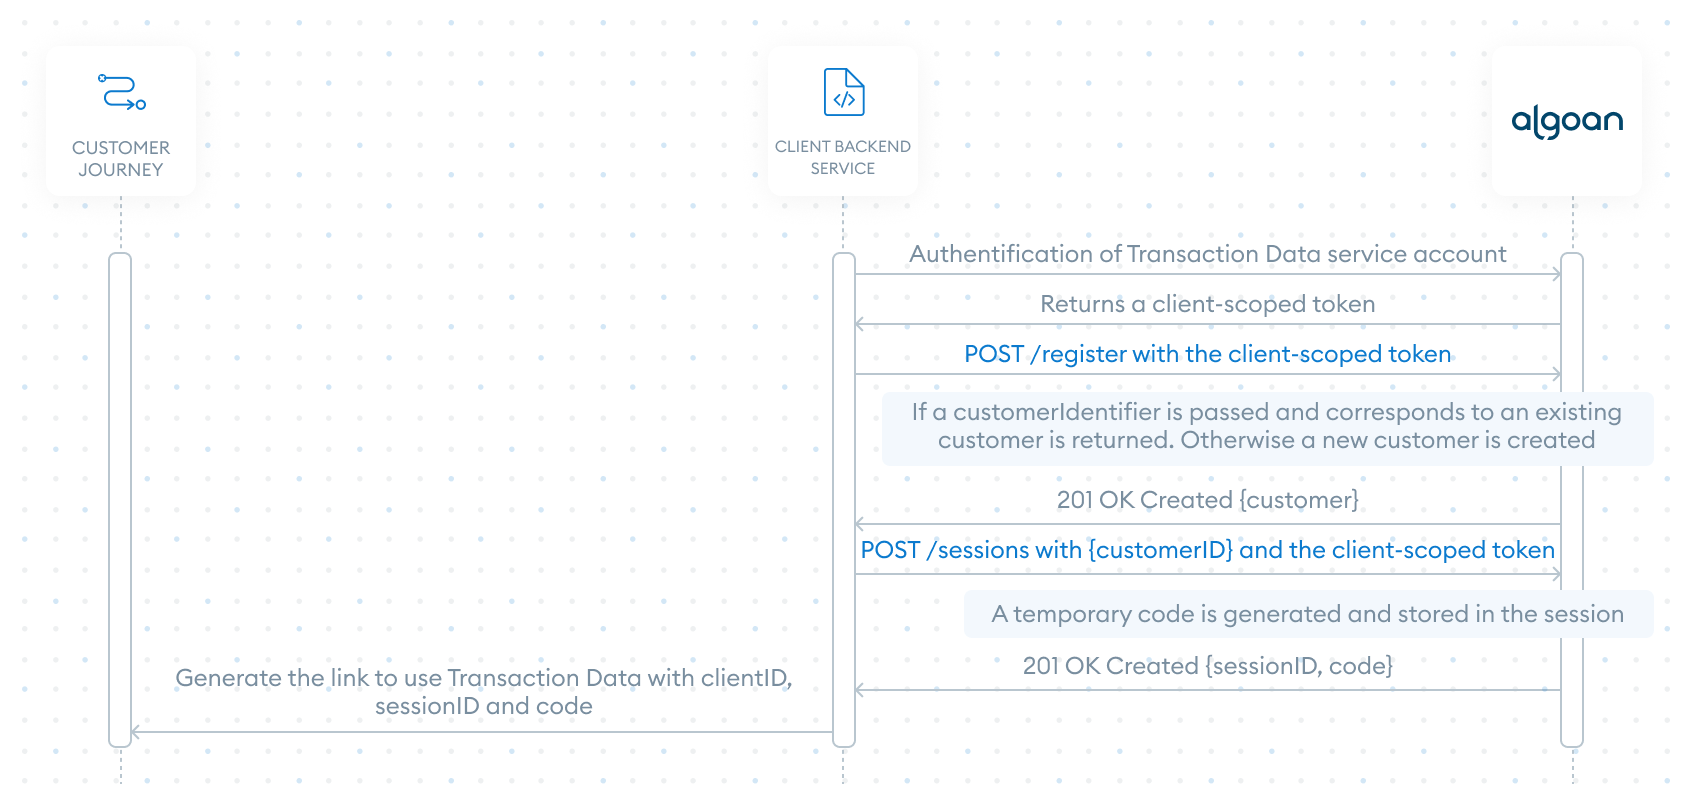
Image 1 - Sequence diagram of the authentication of user
One-time access (for testing purposes)
You can access TD journey just by using the following link :
It is intended for:
- initial exploration
- sandbox testing
- understanding the user experienced
When you click on "Preview" on Algoan's console, this is what is used.
A customer with a random customIdentifier is created when accessing TD this way. You have no ways of mapping this customer to your internal reference hence this method should not be used in live environments.